In this article, we will go through the following steps to successfully test WorkflowGen’s Webhooks API using Postman:
-
IIS Setup
-
Process Setup
-
Incoming Webhook application setup in WorkflowGen
-
Import the Webhook schema in Postman using OpenAPI v2
-
Test the API and Generate code through Postman
1. IIS Setup
The purpose of Webhooks is to authenticate calls using only a token generated in WorkflowGen. To achieve this, we need to make sure that the wfgen/hooks application is using “Anonymous Authentication” in IIS.

2. Process Setup
Next, let’s create a new process and make sure “Sub-process” mode is enabled with access level “API” selected (available since v8.1.2). This allows the process to be launchable via an API such as Webhooks, GraphQL, SOAP, etc. (If you are using WorkflowGen v8.1.1 or older, you can use the “Public” access level instead)

3. Incoming Webhook application setup in WorkflowGen
Now is the time to generate the token that will be used to authenticate the Webhook requests.In the Admin Module, go to Applications → Create a new application of type Incoming Webhook and in the Impersonate username field, make sure to indicate an account that is allowed to launch API calls. In my case I’m using the user wfgen_admin.
Once you save the application, it will generate a URL with the following format: https://[SERVER_DOMAIN]/wfgen/hooks/[hook_token]
The end of the URL contains the hook token and you should treat this as a passport and not share it with anyone since this can be used to authenticate as the impersonated user and perform actions on their behalf. To show you what it looks like, the below screenshot contains a URL with the token (will be replaced after writing this article)

4. Import the Webhook schema in Postman using OpenAPI v2
Now that everything is setup in WorkflowGen, we can start setting up our collection to test in Postman.
An easy way to do this is to use the OpenAPI v2 URL which is available since WorkflowGen 7.17.0
-
In Postman, go to File → Import

-
Select the Link tab, and enter the following URL
https://[YOUR_DOMAIN]/wfgen/hooks/openapi/v2
then click Continue
-
Postman will read the schema definition from the OpenAPI URL and will automatically list the name, format and import type. Make sure you check the option “Generate collection from imported API” and click Import.


5. Test the API and Generate code through Postman
Once imported, you should have a new collection created. You can see it in the Collections tab on the left. Click on the "WorkflowGen Incoming Webhooks" Collection to setup the authentication.In here, you’ll need to put the hook token generated in step 3. This is how WorkflowGen will authenticate all calls launched from Postman.

Now if you expand the collection, you can see a list of all the operations available to execute. Clicking on any of them will generate the request for you. In this example, we click on the “Create a new request” and it automatically sets up the following:
- The request method: POST
- The request URL:
{{baseUrl}}/createRequest - The Authorization inherits from the parent which means it will use the hook token setup in the Parent collection (The same token will be used for all operations in the collection)
- In the Body tab, you will have a full example of what the request body should look like.

We can simplify the body in this example by indicating that we want to launch a process with the name SAMPLE_WEBHOOKS which is running in test mode, and send value “Hello World!” to the data REQUEST_SUBJECT

If we send the request, we get the response below indicating that the request has been launched successfully. In this example, the request number is 769
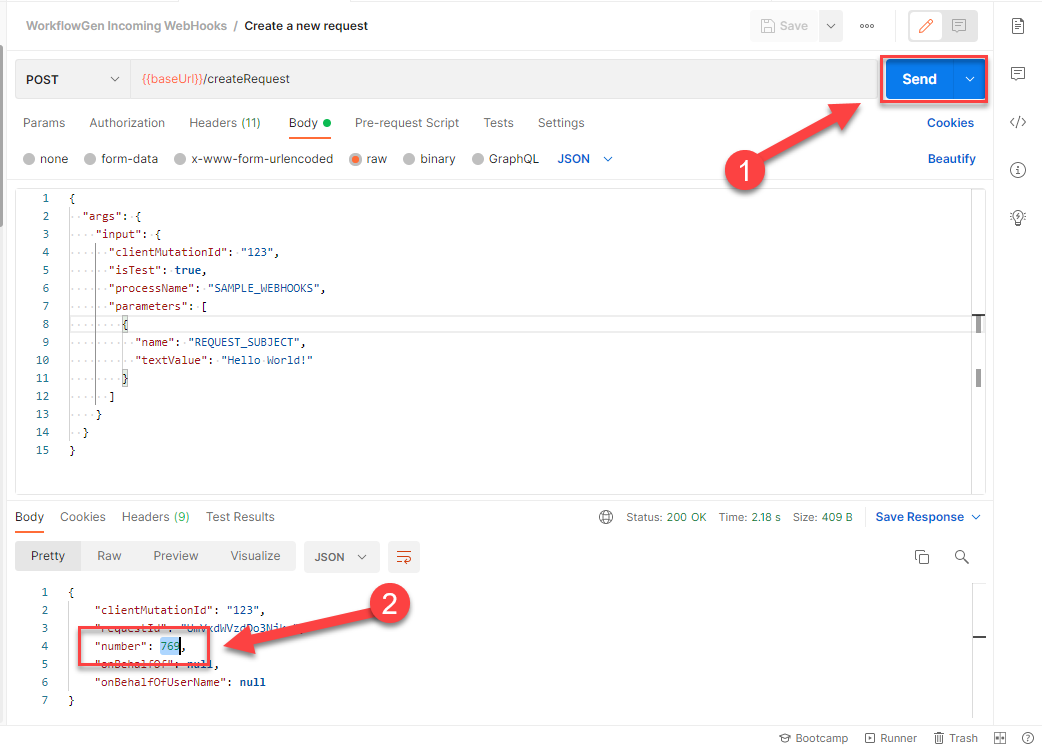
If we look in the WorkflowGen portal, we can see that a new request was launched with the value “Hello World!” sent to the data REQUEST_SUBJECT.

Once you’re happy with your tests and want to implement this functionality in your custom application, you can 1.Save the request to use it later in Postman and 2.Generate the code by clicking on the </> icon on the right: this will generate the code necessary to launch the same request using your preferred programming language. In this example, we are using cURL.
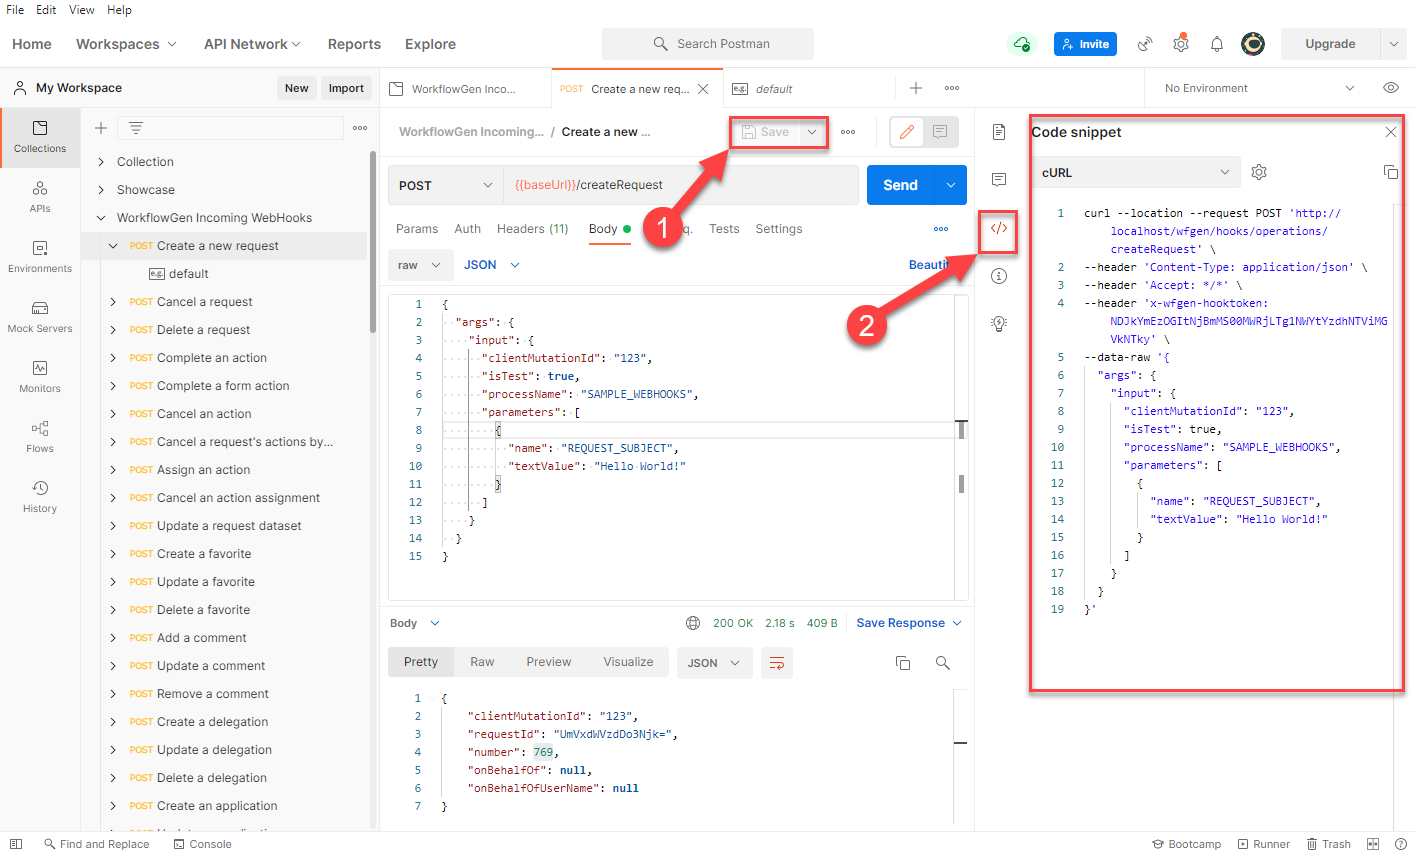
Of course it’s recommended to use coding best practices and store the hook token in a configuration file, which is more secure.
That is all for this article - hope it helps.